Mục tiêu:
Làm một dự án nhỏ – một bộ thiết bị có thể theo dõi các chỉ số thời tiết hiện tại ở khu vực của bạn.
Giới thiệu – OpenWeather:
OpenWeather is a team of IT experts and data scientists that has been practising deep weather data science.

For each point on the globe, OpenWeather provides historical, current and forecasted weather data via light-speed APIs.

Headquarters in London, UK.
API:
API – giao diện lập trình ứng dụng, là một bộ các chức năng được viết bởi các nhà phát triển phần mềm để cho phép mọi người sử dụng dữ liệu hoặc dịch vụ của họ.
Trong dự án này, bạn sẽ cho ESP32 sử dụng API đó để yêu cầu dự báo thời tiết trong ngày cho địa điểm bạn đã chọn.
Chuẩn bị phần cứng:
- Mạch Vietduino Wifi BLE ESP32 (link sản phẩm).
- Màn Hình Oled 0.96 Inch (link sản phẩm).
- Cáp USB Type C (link sản phẩm).
Chuẩn bị phần mềm:
- Cài đặt IDE Arduino vào máy tính (hướng dẫn).
- Cài đặt Driver CH340 vào máy tính (hướng dẫn).
- Cài đặt gói thư viện ESP32 vào IDE Arduino (hướng dẫn).
- Thêm thư viện Adafruit_SSD1306 vào IDE Arduino (hướng dẫn).
- Tương tự, thêm thư viện Arduino_JSON vào IDE Arduino.
Đăng ký OpenWeather.
- Truy cập OpenWeather và nhấn vào nút [Sign in] để tạo tài khoản.

- Sau khi tài khoản của bạn đã được tạo, hãy đăng nhập vào OpenWeather.
- Note: nhớ xác thực tài khoản qua tin nhắn OpenWeather gửi đến trong Email.
Lấy mã API:
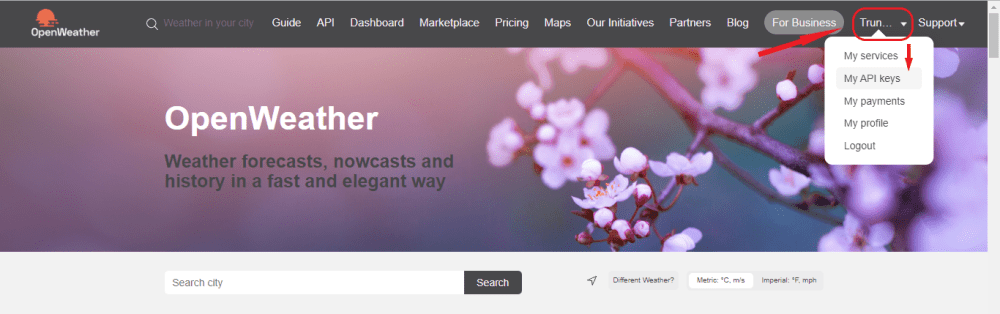
- Nhấn vào thẻ Tài khoản của bạn ở góc phải trên cùng, chọn [My API keys].
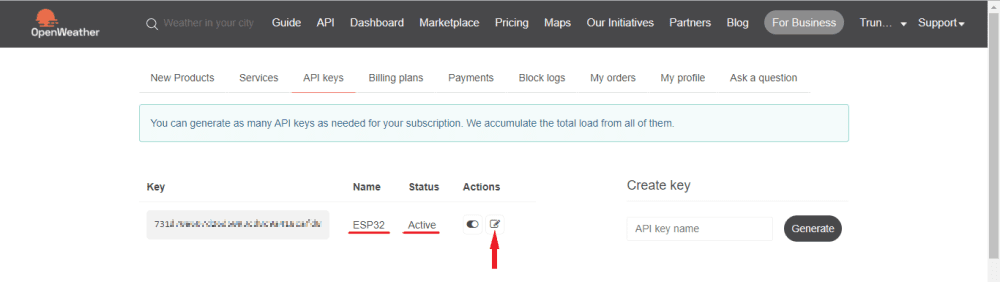
- Để có thể sử dụng API này, có 3 điều bạn cần đảm bảo đã thực hiện:
- Xác thực tài khoản qua Email.
- Đặt tên cho Key bạn sử dụng (trong ví dụ này, Name: ESP32).
- Trạng thái của Key được kích hoạt (trong ví dụ này, Status: Active).
- Nhớ sao chép Key này ở nơi an toàn, vì bạn sẽ cần dùng đến nó khi chỉnh code trong ESP32.
Giới hạn dịch vụ:
- OpenWeather cung cấp rất nhiều loại gói API. Vì chúng ta dùng free, nên sẽ chỉ có một số gói API được sử dụng, cũng như sẽ có một số giới hạn nhất định.
- Để biết thông tin chi tiết hơn, bạn nhấp vào thẻ [Pricing].

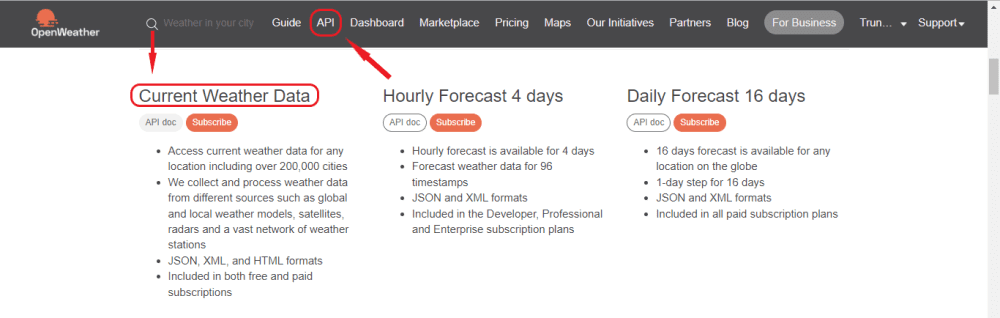
- Với tài khoản free, chúng ta có thể dùng gói “Current Weather Data”. Tuy nhiên bạn lưu ý đến thông số (calls/minute) và (calls/month).
- Tức nếu bạn muốn duy trì liên tục 24/7 việc cập nhập dữ liệu thời tiết mới nhất. Tốt nhất ESP32 chỉ nên thực hiện mỗi “cuộc gọi” với tần suất cách nhau trên >3s, nếu bạn không muốn bị khóa tài khoản ^^!
Gói API sử dụng:
- Thông tin chi tiết về gói API chúng ta dùng trong dự án này. Bạn nhấp vào thẻ [API], rồi tìm đến mục “Current Weather Data”, nhấn vào [API doc], tìm đến mục “API call”.
- Đây là cấu trúc lệnh gọi chúng ta sẽ sử dụng, trong đó:
- {lat} và {lon} là tọa độ địa lý “vĩ độ, kinh độ” (Latitude, Longitude) của khu vực bạn muốn biết thời tiết.
- {API key} là mã khóa API duy nhất của bạn cung cấp cho ESP32.
https://api.openweathermap.org/data/2.5/weather?lat={lat}&lon={lon}&appid={API key}&units=metric
- ESP32 chỉ cần có Internet, để truy cập vào đường dẫn này. OpenWeather sẽ “gửi phản hồi” về cho ESP32 với dữ liệu ở định dạng JSON.
Lấy tọa độ:
- Truy cập vào Google Map, trỏ chuột đến vị trí bạn muốn. Nhấn chuột phải, một bảng thông tin sẽ hiện lên. Cặp giá trị dòng đầu tiên chính là giá trị “vĩ độ, kinh độ” mà ta quan tâm.

Các bước thức hiện:
Bước 1:
- Kết nối màn hình Oled với bo mạch ESP32.
Tip: hàn rào cắm như hình để kết nối dễ dàng hơn.
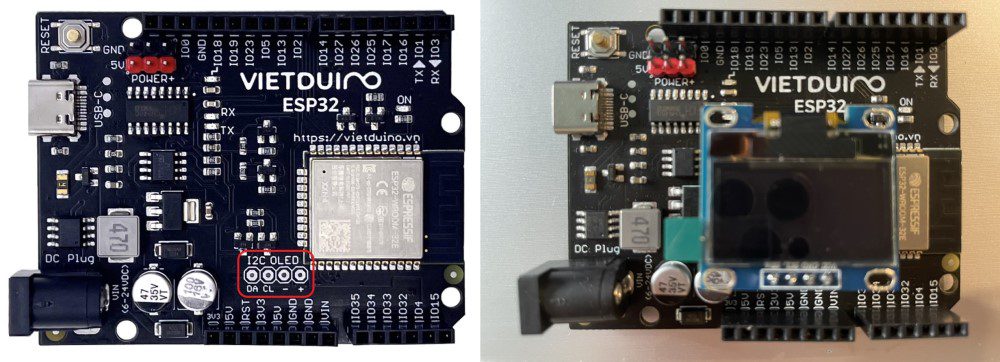
- Dùng cáp USB-typeC để kết nối bo mạch với máy tính.
Bước 2:
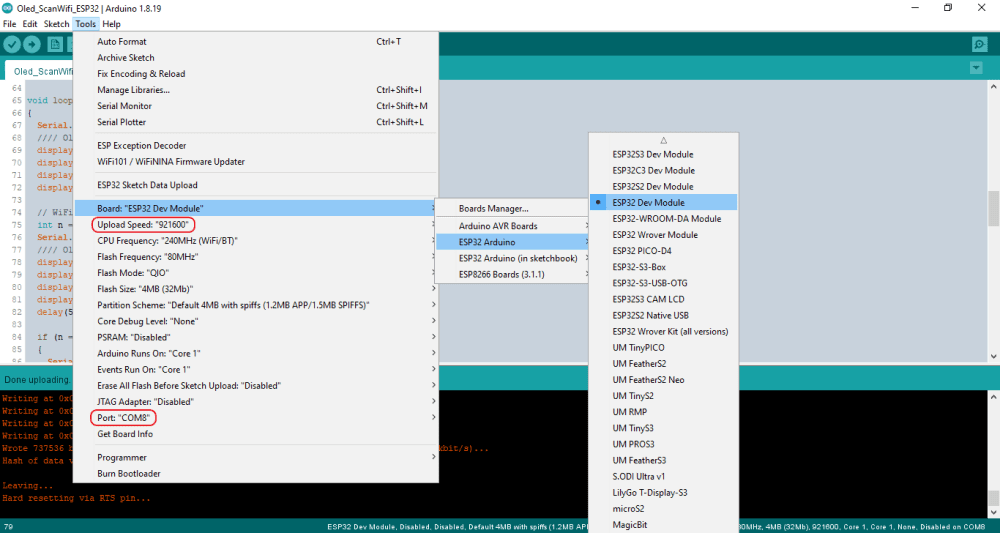
- Mở phần mềm Arduino lên, tạo 1 dự án mới (File → New) và cấu hình như hình dưới đây.
Note: chọn đúng cổng COM (có thể mở Device Manager để xác nhận chắc hơn).
Tip: chọn Upload Speed = 921600 (để tăng tốc độ nạp code vào bo mạch).
- Copy đoạn code sau vào file dự án của bạn.
/* ----------------------------------------------------------- */
/*                           LIBRARY                           */
/* ----------------------------------------------------------- */

#include <SPI.h>
#include <Wire.h>
#include <Adafruit_GFX.h>
#include <Adafruit_SSD1306.h>

#include <WiFi.h>
#include <HTTPClient.h>
#include <Arduino_JSON.h>

/* ----------------------------------------------------------- */
/*                            DEFINE                           */
/* ----------------------------------------------------------- */

//// Oled ////
#define SCREEN_WIDTH 128 // OLED display width, in pixels
#define SCREEN_HEIGHT 64 // OLED display height, in pixels
//
// Declaration for an SSD1306 display connected to I2C (SDA, SCL pins)
#define OLED_RESET -1       // Reset pin # (or -1 if sharing Arduino reset pin)
#define SCREEN_ADDRESS 0x3C //
#define TIME_VIEW 3000      // Unit (ms)

//// Wifi ////
#define SSID_WIFI "REPLACE_WITH_YOUR_SSID"
#define PASS_WIFI "REPLACE_WITH_YOUR_PASSWORD"

//// OpenWeather ////
#define LATITUDE "YOUR_LATITUDE"   // Ex: "10.77"
#define LONGITUDE "YOUR_LONGITUDE" // Ex: "106.65"
#define API_KEY "REPLACE_WITH_YOUR_OPEN_WEATHER_MAP_API_KEY"
//
// Check the API call limits per hour/minute to avoid getting blocked/banned
unsigned long lastTime = 0;
#define TIME_UPDATE 10000UL // Unit (ms)

//// API "Current weather data" ////
#define NAME_URL "http://api.openweathermap.org/data/2.5/weather"
#define PARAM_LAT "?lat="
#define PARAM_LON "&lon="
#define PARAM_API "&appid="
#define PARAM_UNIT "&units=metric"
//
String URL = String(NAME_URL) + String(PARAM_LAT) + String(LATITUDE) + String(PARAM_LON) + String(LONGITUDE) + String(PARAM_API) + String(API_KEY) + String(PARAM_UNIT);

/* ----------------------------------------------------------- */
/*                            OBJECT                           */
/* ----------------------------------------------------------- */

//// Oled ////
Adafruit_SSD1306 display(SCREEN_WIDTH, SCREEN_HEIGHT, &Wire, OLED_RESET);

//// JSON ////
String jsonBuffer;
JSONVar myObject;

enum WeatherContent : int
{
  WEATHER,
  TEMP,
  HUMI,
  FEEL,
  WIND,
  CLOUDS,
};
WeatherContent menu = WEATHER;

/* ----------------------------------------------------------- */
/*                            CONFIG                           */
/* ----------------------------------------------------------- */

void setup()
{
  Serial.begin(115200);

  WiFi.begin(SSID_WIFI, PASS_WIFI);
  Serial.println(F("Connecting"));
  while (WiFi.status() != WL_CONNECTED)
  {
    delay(500);
    Serial.print(F("."));
  }
  Serial.println(F(""));
  //
  Serial.print(F("Connected to WiFi network with IP Address: "));
  Serial.println(WiFi.localIP());
  //
  Serial.print(F("Pls, wait in about "));
  Serial.print(TIME_UPDATE / 1000);
  Serial.println(" seconds");

  // SSD1306_SWITCHCAPVCC = generate display voltage from 3.3V internally
  if (!display.begin(SSD1306_SWITCHCAPVCC, SCREEN_ADDRESS))
  {
    Serial.println(F("SSD1306 allocation failed"));
    for (;;)
      ; // Don't proceed, loop forever
  }
  //
  display.clearDisplay();              // Clear the buffer
  display.setRotation(2);              // Rotate the screen vertically
  display.setTextColor(SSD1306_WHITE); // Draw white text
  display.cp437(true);                 // Use full 256 char 'Code Page 437' font
}

/* ----------------------------------------------------------- */
/*                             MAIN                            */
/* ----------------------------------------------------------- */

void loop()
{
  /* ---------------- Send an HTTP GET request --------------- */
  if ((millis() - lastTime) >= TIME_UPDATE)
  {
    /* ------------- Check WiFi connection status ------------ */
    if (WiFi.status() == WL_CONNECTED)
    {
      jsonBuffer = httpGETRequest(URL.c_str());
      // Serial.println(jsonBuffer);
      myObject = JSON.parse(jsonBuffer);

      // Check received JSON packet has data?
      if (JSON.typeof(myObject) == "undefined")
      {
        Serial.println(F("Parsing input failed!"));
        return;
      }

      /* ----------------------------------------------------- */

      Serial.print("Weather: ");
      Serial.print(myObject["weather"][0]["main"]);
      Serial.print(" - ");
      Serial.println(myObject["weather"][0]["description"]);

      /* ----------------------------------------------------- */

      Serial.print("Temperature: ");
      Serial.print(myObject["main"]["temp"]);
      Serial.println("°C");
      //
      Serial.print("Humidity: ");
      Serial.print(myObject["main"]["humidity"]);
      Serial.println("%");
      //
      Serial.print("Feels Like: ");
      Serial.print(myObject["main"]["feels_like"]);
      Serial.println("°C");

      /* ----------------------------------------------------- */

      Serial.print("Wind Speed: ");
      Serial.print(myObject["wind"]["speed"]);
      Serial.println("m/s");
      //
      Serial.print("Wind Direction: ");
      Serial.print(myObject["wind"]["deg"]);
      Serial.println("°");

      /* ----------------------------------------------------- */

      Serial.print("Cloudiness: ");
      Serial.print(myObject["clouds"]["all"]);
      Serial.println("%");

      /* ----------------------------------------------------- */

      Serial.println(F(""));
    }
    else
    {
      Serial.println(F("WiFi Disconnected"));
    }
    /* ------------------------------------------------------- */
    lastTime = millis();
  }

  displayOled(); // Show current weather information
}

/* ----------------------------------------------------------- */
/*                           FUNCTION                          */
/* ----------------------------------------------------------- */

String httpGETRequest(const char *serverName)
{
  WiFiClient client;
  HTTPClient http;

  // Your Domain name with URL path or IP address with path
  http.begin(client, serverName);

  // Send HTTP POST request
  int httpResponseCode = http.GET();

  String payload = "{}";

  if (httpResponseCode > 0)
  {
    Serial.print(F("HTTP Response code: "));
    Serial.println(httpResponseCode);
    payload = http.getString();
  }
  else
  {
    Serial.print(F("Error code: "));
    Serial.println(httpResponseCode);
  }

  // Free resources
  http.end();

  return payload;
}

/* ----------------------------------------------------------- */

void displayOled()
{
  display.clearDisplay();
  display.setCursor(0, 0);

  switch (menu)
  {
  case WEATHER:
  {
    display.setTextSize(2);
    display.print(myObject["weather"][0]["main"]);
    display.print(F("\n\n"));
    //
    display.setTextSize(1);
    display.print(F("\x1A "));
    display.print(myObject["weather"][0]["description"]);
  }
    menu = TEMP;
    break;
  case TEMP:
  {
    display.setTextSize(1);
    display.print(F("Temperature:"));
    display.print(F("\n\n"));
    //
    display.setTextSize(2);
    display.print(myObject["main"]["temp"]);
    display.print(F(" \xF8\x43"));
  }
    menu = HUMI;
    break;
  case HUMI:
  {
    display.setTextSize(1);
    display.print(F("Humidity:"));
    display.print(F("\n\n"));
    //
    display.setTextSize(2);
    display.print(myObject["main"]["humidity"]);
    display.print(F(" %"));
  }
    menu = FEEL;
    break;
  case FEEL:
  {
    display.setTextSize(1);
    display.print(F("Feels Like:"));
    display.print(F("\n\n"));
    //
    display.setTextSize(2);
    display.print(myObject["main"]["feels_like"]);
    display.print(F(" \xF8\x43"));
  }
    menu = WIND;
    break;
  case WIND:
  {
    display.setTextSize(1);
    display.print(F("Wind:"));
    display.print(F("\n\n"));
    //
    display.setTextSize(2);
    display.print(myObject["wind"]["speed"]);
    display.print(F(" m/s"));
    display.print(F("\n"));
    //
    display.setTextSize(1);
    display.print(F("\n"));
    //
    display.setTextSize(2);
    display.print(myObject["wind"]["deg"]);
    display.print(F(" \xF8"));
  }
    menu = CLOUDS;
    break;
  case CLOUDS:
  {
    display.setTextSize(1);
    display.print(F("Cloudiness:"));
    display.print(F("\n\n"));
    //
    display.setTextSize(2);
    display.print(myObject["clouds"]["all"]);
    display.print(F(" %"));
  }
    menu = WEATHER;
    break;
  }

  display.display();
  delay(TIME_VIEW);
}
Bước 3:
- Để ESP32 truy cập được Internet, bạn cần cung cấp thông tin mạng Wifi của bạn cho ESP32 sử dụng, gồm Tên mạng Wifi (SSID) và Mật khẩu Wifi (PASS).
- Note: nếu mạng Wifi của bạn không có mật khẩu, bạn để trống trong cặp dấu ngoặc đơn (“”).
/* --------------------------- Wifi -------------------------- */
// Your network SSID (name)
#define SSID_WIFI "REPLACE_WITH_YOUR_SSID"
// Your network password
#define PASS_WIFI "REPLACE_WITH_YOUR_PASSWORD"
- ESP32 cũng cần được cung cấp API Key (có tất cả 32 kí tự) mà bạn đã có từ bước trên, cả Latitude và Longitude, để nó có thể truy cập và lấy đúng dữ liệu thời tiết từ OpenWeather.
/* ----------------------- OpenWeather ----------------------- */
#define LATITUDE "YOUR_LATITUDE"    // Ex: "10.77"
#define LONGITUDE "YOUR_LONGITUDE"  // Ex: "106.65"
#define API_KEY "REPLACE_WITH_YOUR_OPEN_WEATHER_MAP_API_KEY"
- Hai thông số cuối là Time View (thời gian xem mỗi nội dung trên Oled) và Time Update (thời gian cập nhập dữ liệu từ OpenWeather) – đây cũng là khoảng thời gian đợi khi ESP32 mới khởi động.
/* --------------------------- Oled -------------------------- */
#define TIME_VIEW 3000      // Unit (ms)

/* ----------------------- OpenWeather ----------------------- */
#define TIME_UPDATE 10000UL // Unit (ms)
Bước 4:
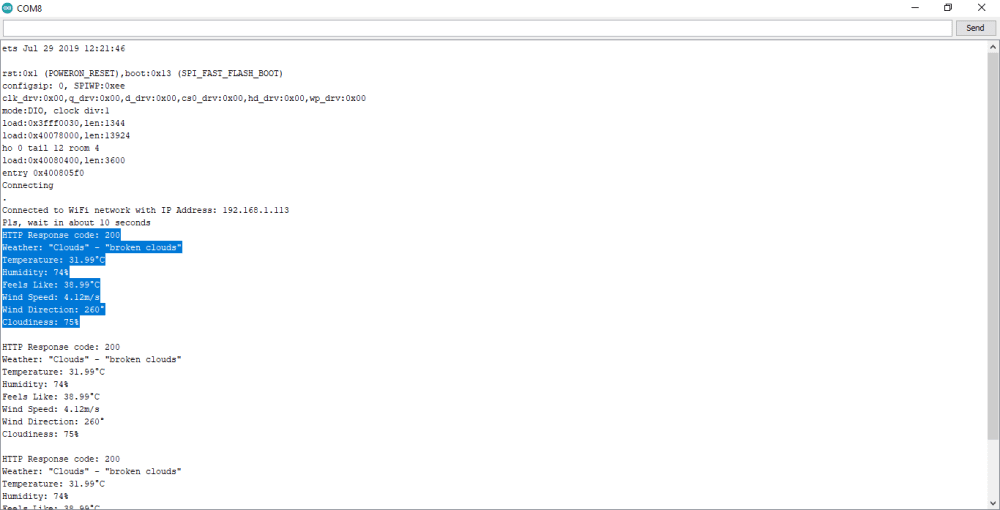
- Nạp chương trình và xem kết quả hiển thị trên màn hình Oled.
(video)
- Bạn cũng có thể mở cổng Serial Monitor (115200 baud) xem thông tin chi tiết hơn.